OK, finally. I got the side art on. It was pretty easy actually once I figured out how to line it up. I felt like a genius when it finally clicked but I'm sure it is an obvious solution.
 The first thing I did was put a piece of tape 2-3/4" from the top - no need to be precise here - just make sure that the piece of tape covers the imaginary horizontal line 2-3/4" from the top of the cabinet. Then, using a carpenter's square (pictured) to get a straight line I marked the line in pencil on the tape. This gave me the line to place the top edge of the side art on. I repeated this process along the back edge of the cabinet (2-3/4" again) and now had a vertical line to place the left edge of the side art on (or right edge depending which side you are doing).
In order to use the carpenter's square properly you set the short edge of the ruler in the picture to 2-3/4". Then you place the black handle on the top edge of the cabinet so that the short edge of the ruler is hanging down exactly 2-3/4". Next you place your pencil on the bottom of the ruler's edge and run the carpenter's square along the top while moving the pencil at the same time. This will give you a perfectly straight line exactly 2-3/4" from the top (on the masking tape!). This is an invaluable trick for building things and laying out lines in general.
Now that I knew exactly where to place the side art, I just taped it to the side.
 Next, I removed all of the tape near the top and peeled off the paper backing from the sticker and cut it away with the scissors.
 Then, very carefully and using my vinyl squeegee, I applied pressure to the top portion of the decal where I removed the paper backing. No turning back now! The decal is in place!
Then, I removed all of the masking tape around the edges now that it can hang on it's own. Finally, I removed the rest of the paper backing starting at the top and working my way down with the squeegee and pressing the decal into place.
 After the decal was applied the only thing left to do was remove the top layer of paper. This part took a long time - the paper did not come off easy and in fact during this process there was a tendency to remove the actual decal form the force of removing the top layer of paper. I think this was due to my own inexperience - I did not prep the surface before applying the sticker and I should have used some rubbing alcohol to really clean it and remove any oils that may have been present.
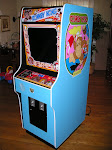
Anyway, it came out great:
 I didn't take as many pictures as I would have liked because my hands were tied and I was a little nervous. It was actually very easy! I can really see the finish line now.
More later.
 The first thing I did was put a piece of tape 2-3/4" from the top - no need to be precise here - just make sure that the piece of tape covers the imaginary horizontal line 2-3/4" from the top of the cabinet. Then, using a carpenter's square (pictured) to get a straight line I marked the line in pencil on the tape. This gave me the line to place the top edge of the side art on. I repeated this process along the back edge of the cabinet (2-3/4" again) and now had a vertical line to place the left edge of the side art on (or right edge depending which side you are doing).
In order to use the carpenter's square properly you set the short edge of the ruler in the picture to 2-3/4". Then you place the black handle on the top edge of the cabinet so that the short edge of the ruler is hanging down exactly 2-3/4". Next you place your pencil on the bottom of the ruler's edge and run the carpenter's square along the top while moving the pencil at the same time. This will give you a perfectly straight line exactly 2-3/4" from the top (on the masking tape!). This is an invaluable trick for building things and laying out lines in general.
Now that I knew exactly where to place the side art, I just taped it to the side.
 Next, I removed all of the tape near the top and peeled off the paper backing from the sticker and cut it away with the scissors.
 Then, very carefully and using my vinyl squeegee, I applied pressure to the top portion of the decal where I removed the paper backing. No turning back now! The decal is in place!
Then, I removed all of the masking tape around the edges now that it can hang on it's own. Finally, I removed the rest of the paper backing starting at the top and working my way down with the squeegee and pressing the decal into place.
 After the decal was applied the only thing left to do was remove the top layer of paper. This part took a long time - the paper did not come off easy and in fact during this process there was a tendency to remove the actual decal form the force of removing the top layer of paper. I think this was due to my own inexperience - I did not prep the surface before applying the sticker and I should have used some rubbing alcohol to really clean it and remove any oils that may have been present.
Anyway, it came out great:
 I didn't take as many pictures as I would have liked because my hands were tied and I was a little nervous. It was actually very easy! I can really see the finish line now.
More later.