After getting the cabinet home, I took a bunch of pictures (both inside and out) so I can have something to compare the finished product to and to track my progress. The cabinet is in decent shape but there is a lot of work to be done to get it looking like it just came out of the factory.
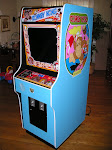
Here are a few shots of the entire cabinet from several angles to give you an idea of what I'm going to be working with. The existing side art will have to come off first.
Here are a few shots of the entire cabinet from several angles to give you an idea of what I'm going to be working with. The existing side art will have to come off first.
 The next shot shows the cabinet from the other side - the side art is already peeling off! Maybe I'll get lucky and it will come off easily.
 I don't know if you can see but there are multiple holes punched through both sides that will have to be patched. It appears as though this cabinet was converted from a Donkey Kong to a Nintendo Vs. cabinet at some point. The vertical Donkey Kong monitor would have to be turned on its side (or replaced) because the Nintendo Vs. games all ran on two(!) horizontal monitors stacked on top of one another. The holes are for the various supports for the monitors. The original Donkey Kong cab had two bolts on each side in order to support a monitor bracket - right through the side art! Even though I'm going for authenticity, I think I'm going to make some minor design "improvements" along the way and this will be one of them - no bolts through the side panels!
Finally, here is a shot of the back of the cabinet. I really should take some head-on pictures of the front and back but this will have to do for now. You can see the two holes cut out near the top - this was for transporting it around. There are two casters on the bottom so all you have to do is tip it back onto the wheels and grab it by the two openings. It is quite easy to move around.
 I will post some close-up shots later but I can already tell that the back part is going to be the toughest to restore - plus, the back door was missing when I picked it up so I'll have to make an entirely new one!
More later.